You update your WordPress website, refresh the page, and the old version is still there.
Maybe you changed some text on your homepage. Maybe you swapped out an image, updated your navigation menu, adjusted some spacing in Elementor, or fixed a typo that’s been bothering you for weeks. You click save, reload the page, and somehow nothing appears to change.
If you’re new to WordPress, this is usually the moment where panic starts setting in. It feels like the website is broken, like WordPress ignored your changes, or like something on the server failed completely. A lot of people immediately assume they’ve messed something up.
Most of the time, though, the issue is much simpler than that.
You’re usually looking at a cached version of the page.
Caching is one of the most important parts of modern website performance, but it’s also one of the most misunderstood. Nearly every WordPress website uses caching in some form, whether the site owner realizes it or not. Hosting providers use it, browsers use it, plugins use it, and services like Cloudflare use it too.
That’s good news for website speed. It’s not always great news when you’re trying to troubleshoot updates that refuse to appear.
One of the reasons caching confuses beginners so much is because there usually isn’t just one cache involved. Your browser may be storing an older version of the page locally on your computer while your WordPress caching plugin stores another version on the server. At the same time, Cloudflare may still be serving cached assets globally through its CDN network.
This is why you’ll sometimes see situations where:
- your desktop shows the old version of the page
- your phone shows the new version
- logged-in admins see updates while visitors don’t
- the site looks correct in incognito mode but broken everywhere else
From the outside, it feels random and inconsistent. Once you understand how caching works, though, these situations start making much more sense.
In this guide, we’re going to walk through how WordPress cache actually works, why your website changes sometimes don’t appear immediately, and how to properly clear the different cache layers that may be affecting your site. We’ll also cover common troubleshooting mistakes, explain why page builders like Elementor often make cache issues more noticeable, and talk about what to do when clearing cache still doesn’t solve the problem.
By the end, you’ll have a much better understanding of how WordPress caching works and how to troubleshoot it calmly instead of randomly changing settings and hoping something works.
What Is WordPress Cache?
At its core, cache is simply temporary stored data.
Normally, when somebody visits a WordPress website, the server has to do quite a bit of work behind the scenes before the page loads. WordPress needs to process PHP, communicate with the database, load plugins, assemble the page content, generate styles and scripts, and then send everything back to the visitor’s browser.
That process happens very quickly, but it still requires server resources every single time someone visits the site.
Caching exists to make that process faster.
Instead of rebuilding the same page from scratch repeatedly, caching systems create stored versions of webpages that can be delivered much more quickly. Think of it like preparing meals ahead of time instead of cooking every single order individually from scratch. The result is faster load times, less strain on the server, and a better experience for visitors.
Without caching, many modern WordPress websites would feel noticeably slower — especially websites using visual page builders, WooCommerce, large image galleries, or lots of plugins.
The problem is that cached versions don’t always refresh immediately.
Imagine your website stored a version of your homepage yesterday afternoon. Today, you go in and replace some text or redesign a section. The live version of the site may technically be updated already, but somewhere along the chain, a caching system may still be serving yesterday’s stored version of the page instead.
That’s why you can make changes to a WordPress site but continue seeing the older version afterward.
Caching itself is not a sign something is broken. In fact, caching is usually a sign your website is optimized properly. The challenge is simply understanding where cache exists and how to clear it correctly when it starts getting in the way.
Why Cache Issues Feel So Random
One of the reasons WordPress caching becomes frustrating so quickly is because there are often several different cache layers working independently at the same time.
Your browser may cache website files locally on your computer. A WordPress caching plugin may store pre-generated versions of pages on the server. Your hosting provider may apply server-level caching automatically without you even realizing it. Then Cloudflare or another CDN may store cached versions globally across multiple data centres around the world.
This creates situations where different devices or users may see completely different versions of the same website simultaneously.
A lot of business owners first run into this after redesigning a homepage or updating a section of their site. They’ll make a change, check the website on their laptop, and everything still looks old. Then they check their phone and suddenly the changes are there.
At that point, people start wondering whether the site is broken, whether the update failed, or whether WordPress itself is unstable.
Usually, none of those things are true.
Different cache layers are simply refreshing at different times.
Understanding that concept alone removes a huge amount of stress from WordPress troubleshooting. Most cache-related problems are fixable once you understand where old versions of the site might still be stored.
Start With the Simplest Troubleshooting Steps
When website updates aren’t appearing properly, most people immediately start diving into plugin settings or server dashboards. In reality, the issue is often much simpler.
The very first thing worth trying is a hard refresh.
A hard refresh forces your browser to request a fresh version of the page instead of loading locally cached assets.
- Windows:
CTRL + F5orCTRL + SHIFT + R - Mac:
CMD + SHIFT + R
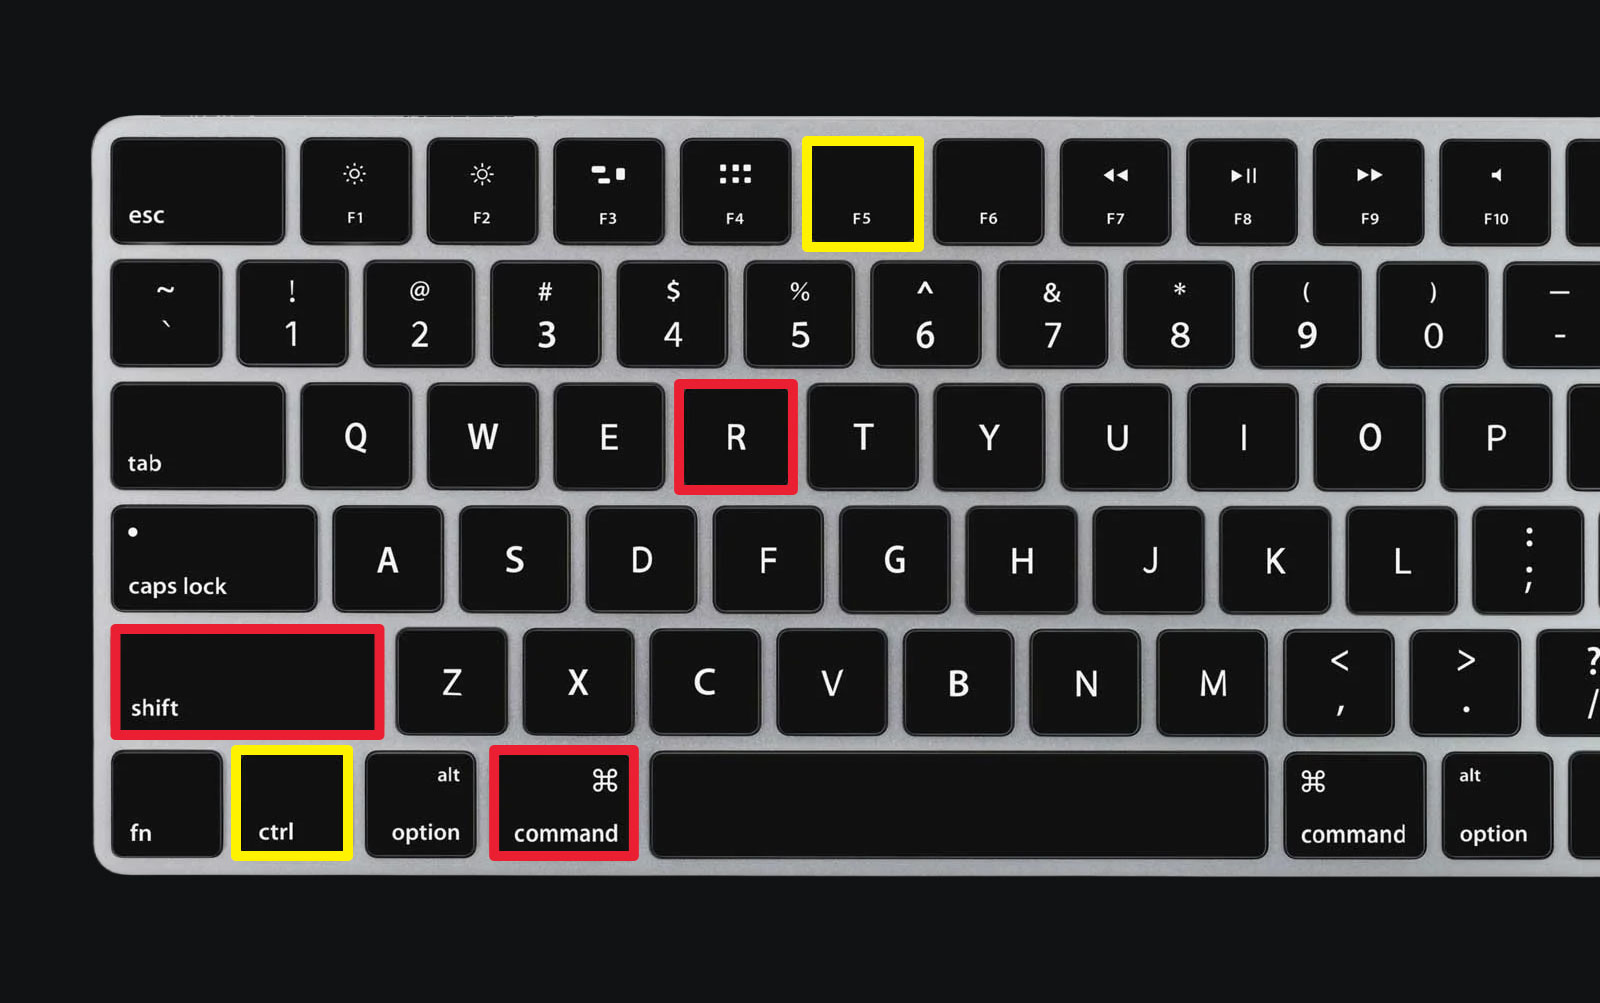
This solves the problem surprisingly often.
Browsers are designed to cache aggressively because cached files make websites load faster. Sometimes all that’s happening is your browser is holding onto an older version of the page locally.
If a hard refresh doesn’t work, the next thing to try is opening the page in an incognito or private browsing window.
This is one of the fastest ways to narrow down whether browser cache is involved. Incognito mode bypasses most locally stored browser cache and session data. If the updated version of the site appears correctly there, you already know the issue is likely browser-related rather than WordPress itself.
At that point, fully clearing your browser cache is usually the next step.
How to Clear Browser Cache Properly
Most browsers handle cache clearing in roughly the same way.
In Google Chrome, open the three-dot menu in the top-right corner and select “Delete Browsing Data.” From there, choose “Cached images and files” and clear the data.
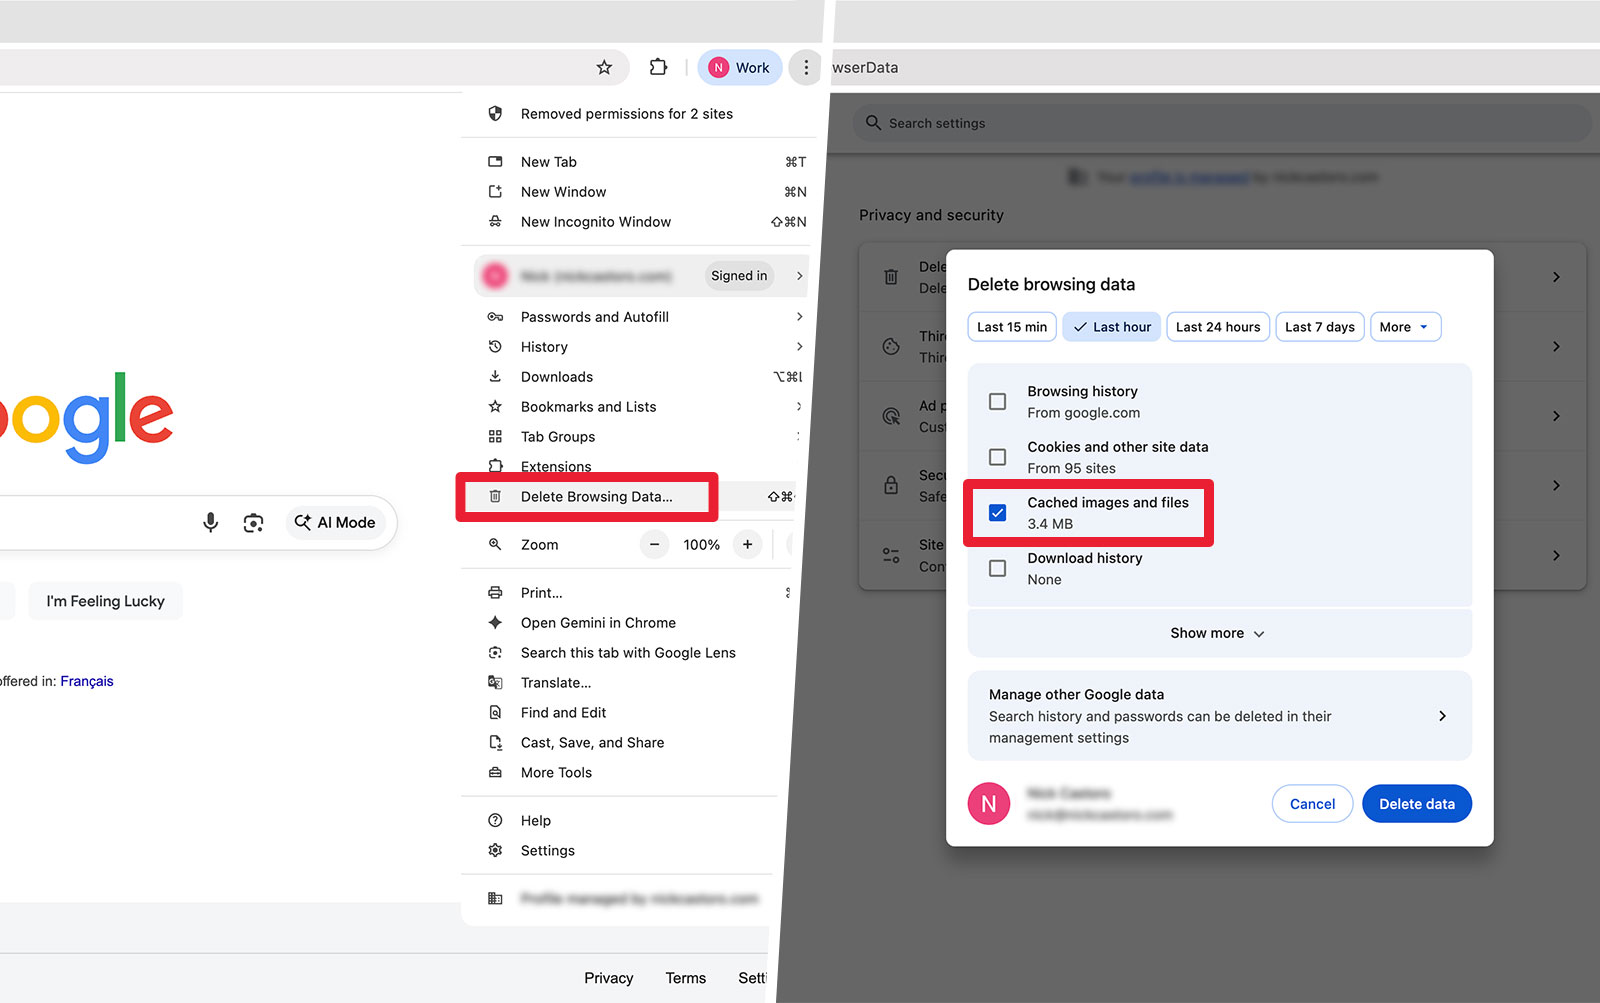
After clearing the cache, reload your website and check whether your updates now appear properly.
One thing people frequently overlook during troubleshooting is mobile browser caching. Mobile devices often cache aggressively to improve performance on slower cellular connections. It’s extremely common for desktop browsers to show the newest version of a site while phones continue loading older cached assets.
This is especially noticeable after homepage redesigns, Elementor edits, CSS changes, image replacements, or responsive layout adjustments.
If your phone still shows an older version of the site, try opening the page in private browsing mode first. If the changes appear there, you’re almost certainly dealing with mobile browser cache rather than a WordPress issue.
Clearing Cache Inside WordPress
If browser cache isn’t the problem, the next place to look is your WordPress caching plugin.
Most performance plugins create cached versions of pages to improve load speed. These plugins work extremely well most of the time, but occasionally they continue serving outdated versions of pages after updates have been made.
Different plugins use slightly different terminology, but you’ll usually see buttons labelled things like “Clear Cache,” “Purge Cache,” “Flush Cache,” or “Purge All.”
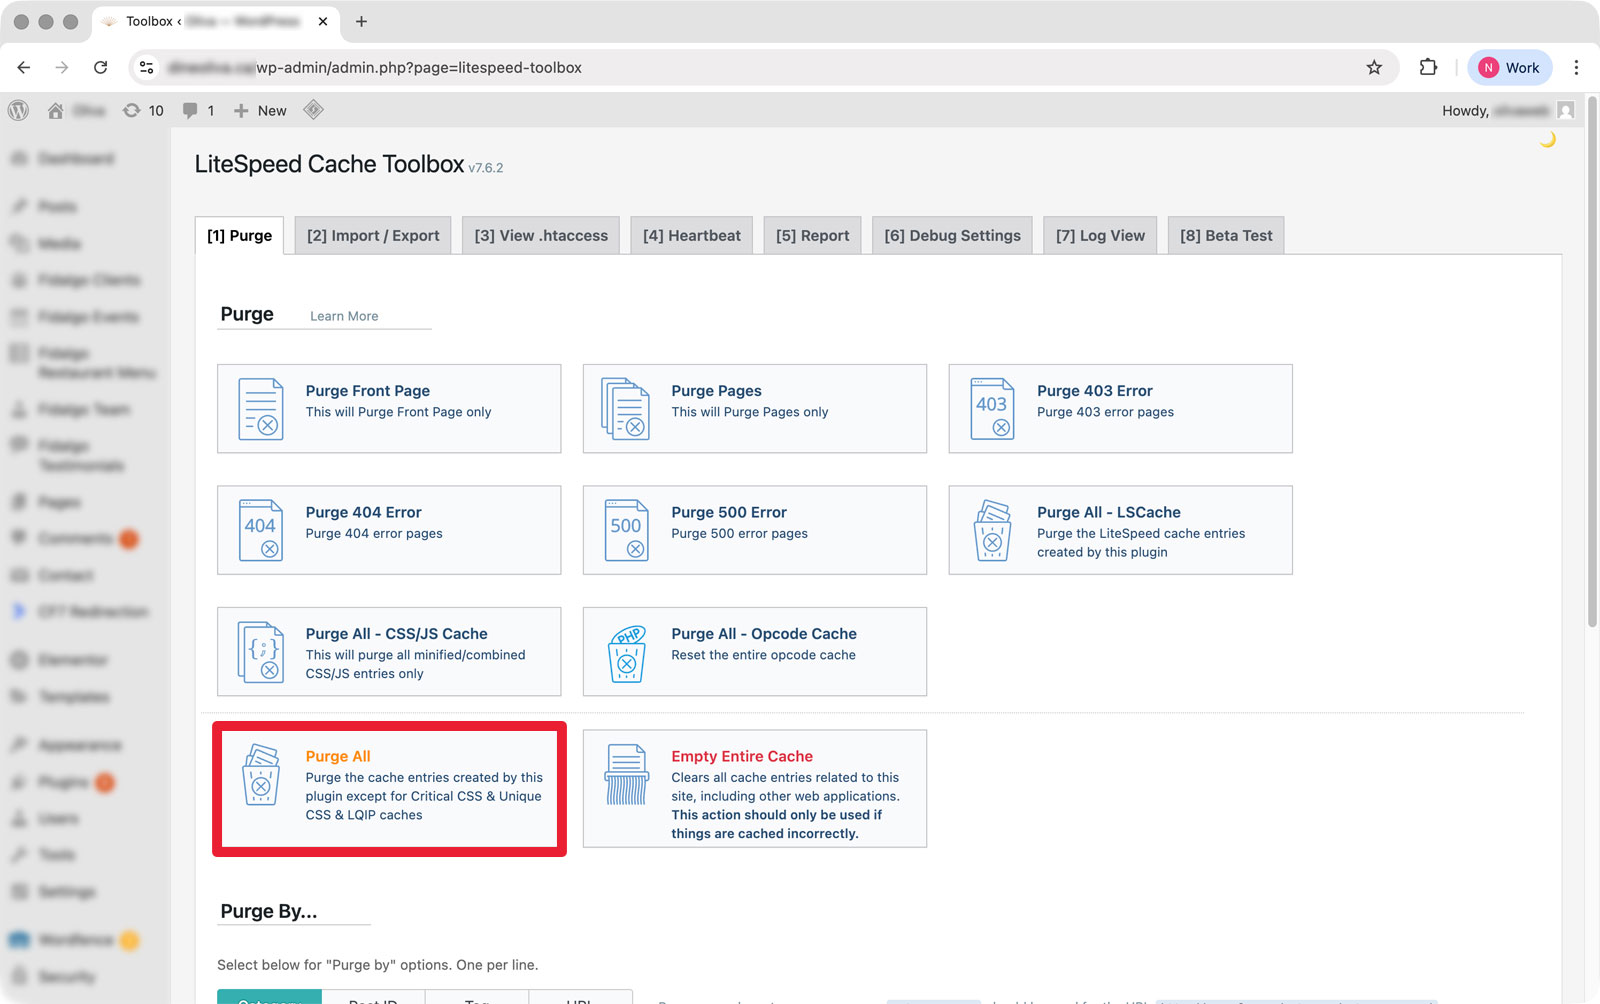
LiteSpeed Cache is one of the most popular caching plugins right now, especially on hosting providers running LiteSpeed servers. To clear your website cache in LiteSpeed, open the LiteSpeed Cache menu in WordPress, go to Toolbox → Purge, and click “Purge All.”
One thing that confuses a lot of beginners with LiteSpeed Cache is the number of different purge options available. In most situations, you do not need to worry about purging specific cache types individually. “Purge All” is usually the safest and simplest option, and it solves the vast majority of cache-related update issues.
You’ll also notice an option called “Empty Entire Cache.” This is much more aggressive and clears cache entries beyond just your WordPress site. Unless you specifically know you need it, most users should leave this alone and start with “Purge All” instead.
The other options — like CSS/JS Cache, Opcode Cache, and individual error-page cache purges — are generally meant for more advanced troubleshooting scenarios.
LiteSpeed is extremely powerful, but because it also handles aggressive optimization features, cache-related issues can sometimes become more noticeable. CSS files, JavaScript assets, mobile layouts, and generated styles may continue loading older versions temporarily until everything refreshes properly.
A lot of beginners first notice this after updating Elementor sections. They’ll make layout changes, save the page, refresh the site, and suddenly nothing appears different.
Usually, the changes were saved successfully. The site is simply still loading older optimized assets somewhere.
WP Super Cache is one of the longest-running and most widely used caching plugins in the WordPress ecosystem. To clear cache in WP Super Cache, open the Settings → WP Super Cache menu in WordPress and click the “Delete Cache” button under the Easy tab.
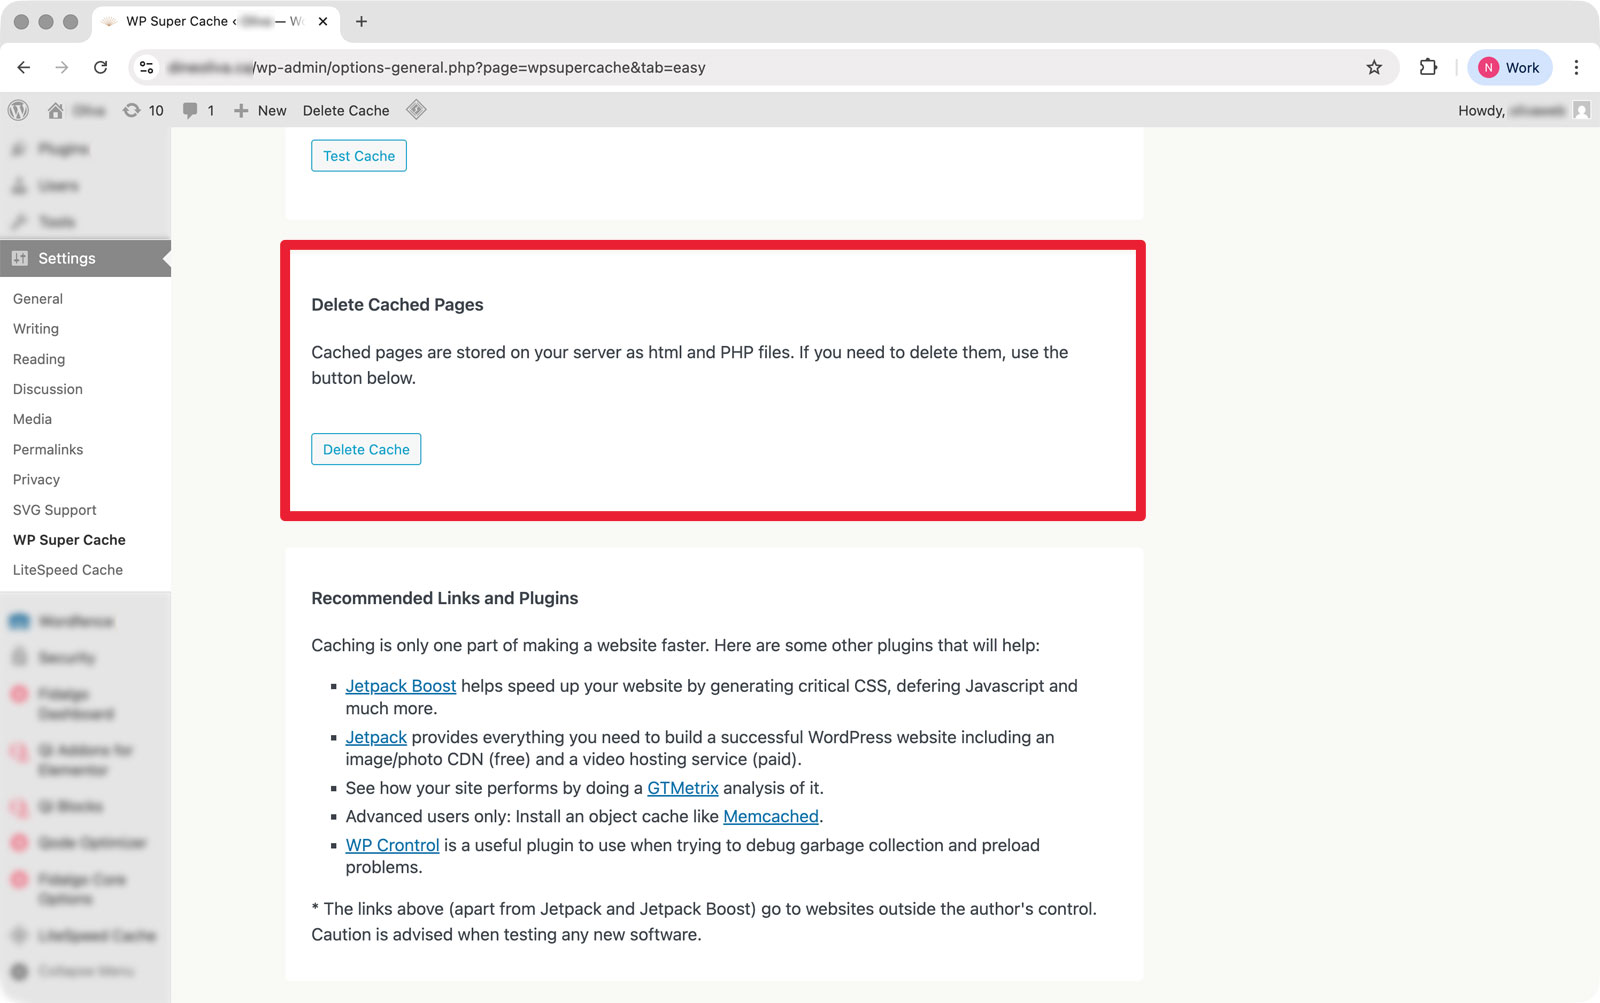
WP Super Cache is generally fairly beginner-friendly compared to some of the more advanced performance plugins available today. In most situations, simply deleting the cache is enough to force WordPress to generate fresh versions of your pages and display your latest changes properly.
W3 Total Cache is another popular option, though it’s more advanced and tends to expose users to a larger number of optimization settings. If you’re using W3 Total Cache, you can generally clear everything through the “Empty All Caches” option under the Performance menu.

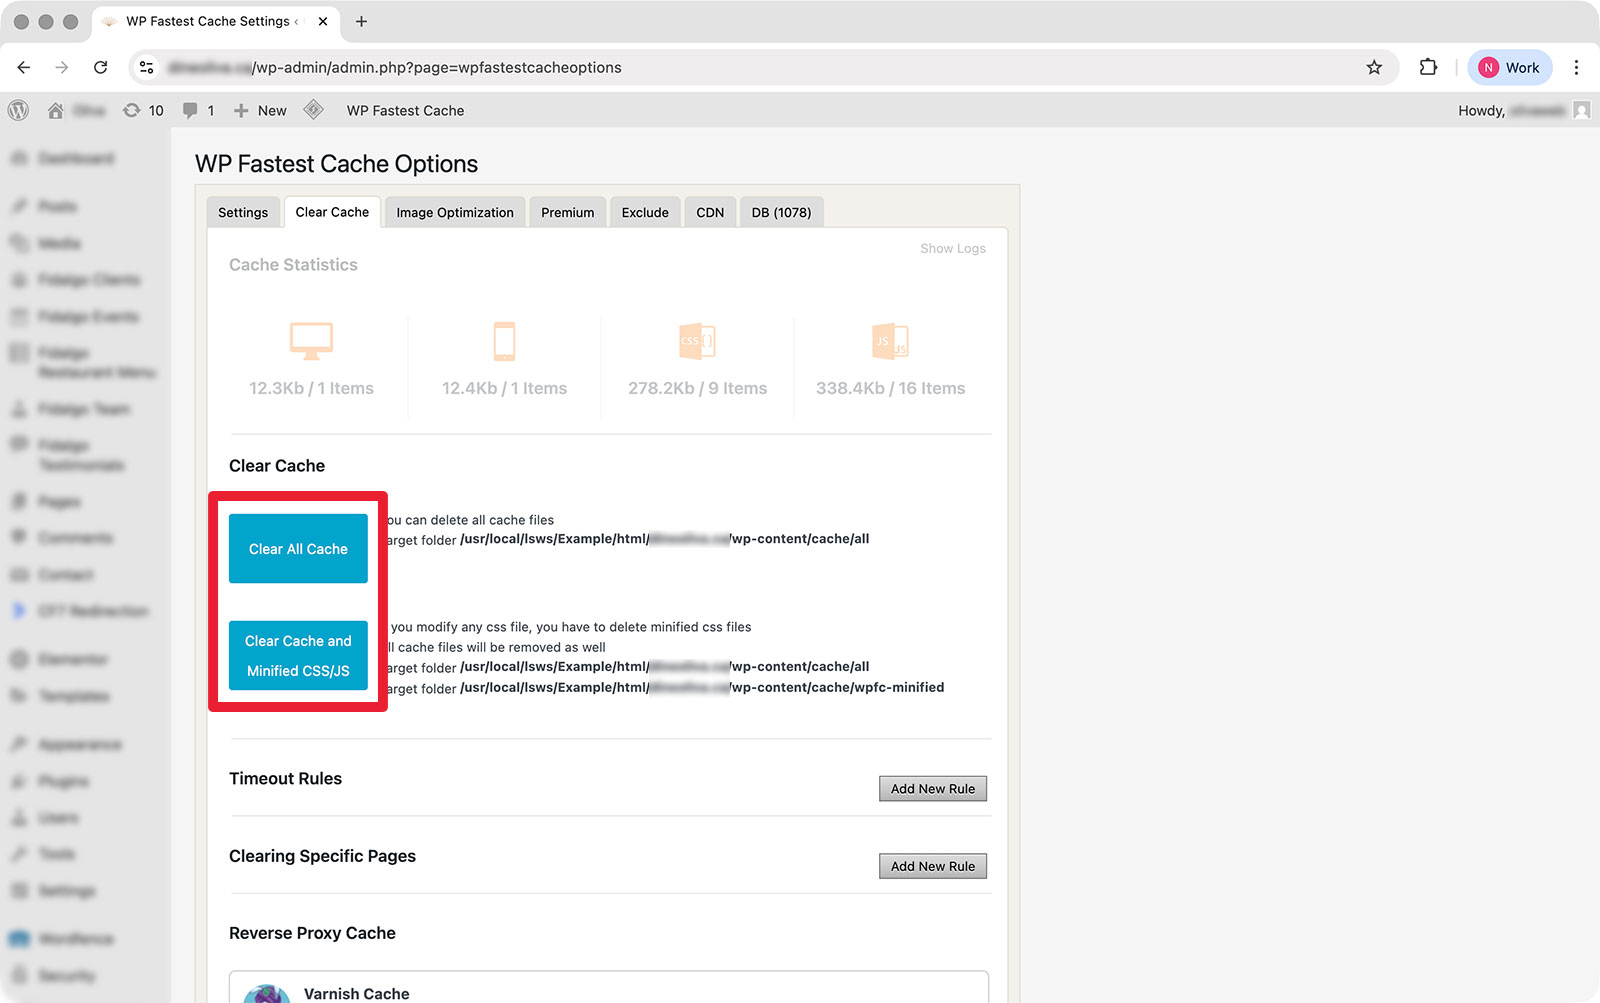
WP Fastest Cache is also a very popular WordPress caching plugin, especially on smaller business websites and budget hosting environments. To clear cache in WP Fastest Cache, open the WP Fastest Cache menu in WordPress and click the “Clear All Cache” button. If you’ve recently made major design or layout changes, you can also use “Clear Cache and Minified CSS/JS” to clear optimized assets alongside the regular page cache.
WP Rocket is one of the most popular premium caching plugins for WordPress, known for its relatively simple interface and beginner-friendly setup. To clear cache in WP Rocket, open the Settings → WP Rocket menu in WordPress. Under the Dashboard tab, click the “Clear and Preload” button on the right side of the window.
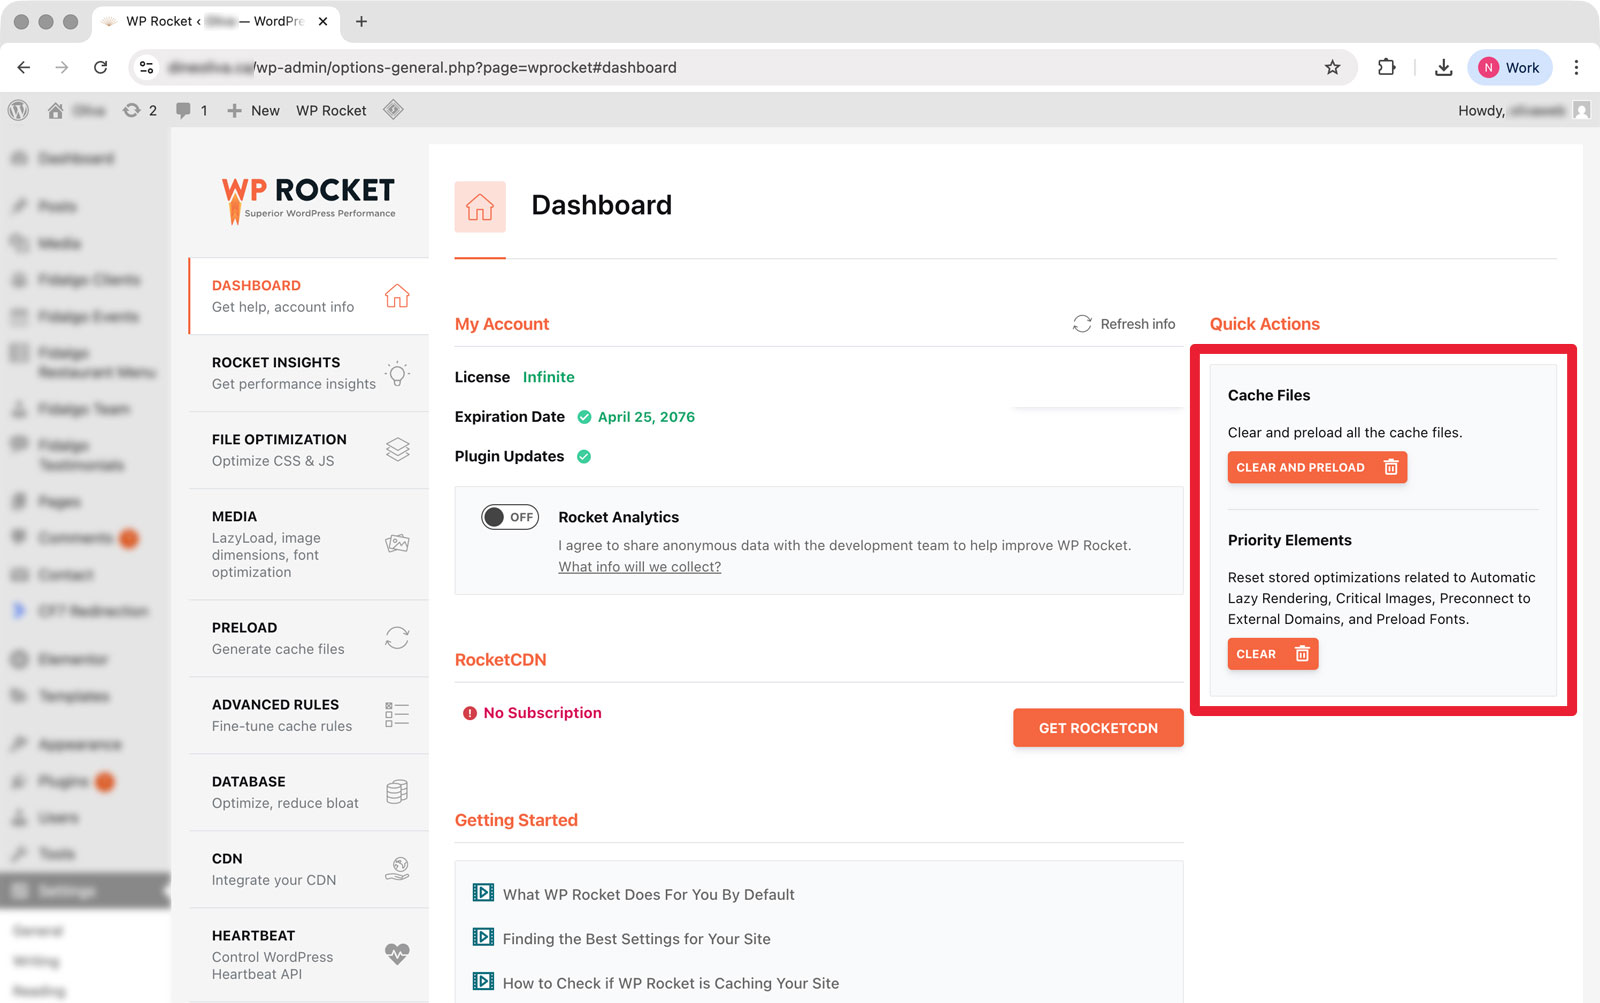
This clears your existing cache and immediately begins generating fresh cached versions of your pages, which helps ensure visitors see your latest website changes properly.
One important thing to understand here is that modern caching plugins often do much more than simple page caching. Many also handle CSS minification, JavaScript optimization, delayed script loading, image optimization, critical CSS generation, and lazy loading.
This means optimization settings themselves can occasionally create layout problems or prevent updates from appearing correctly.
A lot of people get into trouble by enabling every optimization feature they can find without testing changes incrementally. Then, when something breaks, they have no idea which setting caused the issue.
The better approach is always to make one change at a time and test the website carefully afterward.
Server Cache and Hosting-Level Cache
This is where things usually start becoming confusing for beginners.
Even after successfully clearing browser cache and plugin cache, your hosting provider may still be serving cached versions of your pages directly from the server itself.
Many managed WordPress hosts apply server-level caching automatically because it improves performance dramatically. Sometimes users don’t even realize server caching exists until they start troubleshooting update issues.
Depending on your hosting provider, cache controls may exist inside cPanel, the hosting dashboard, a WordPress admin toolbar, or a custom optimization panel.
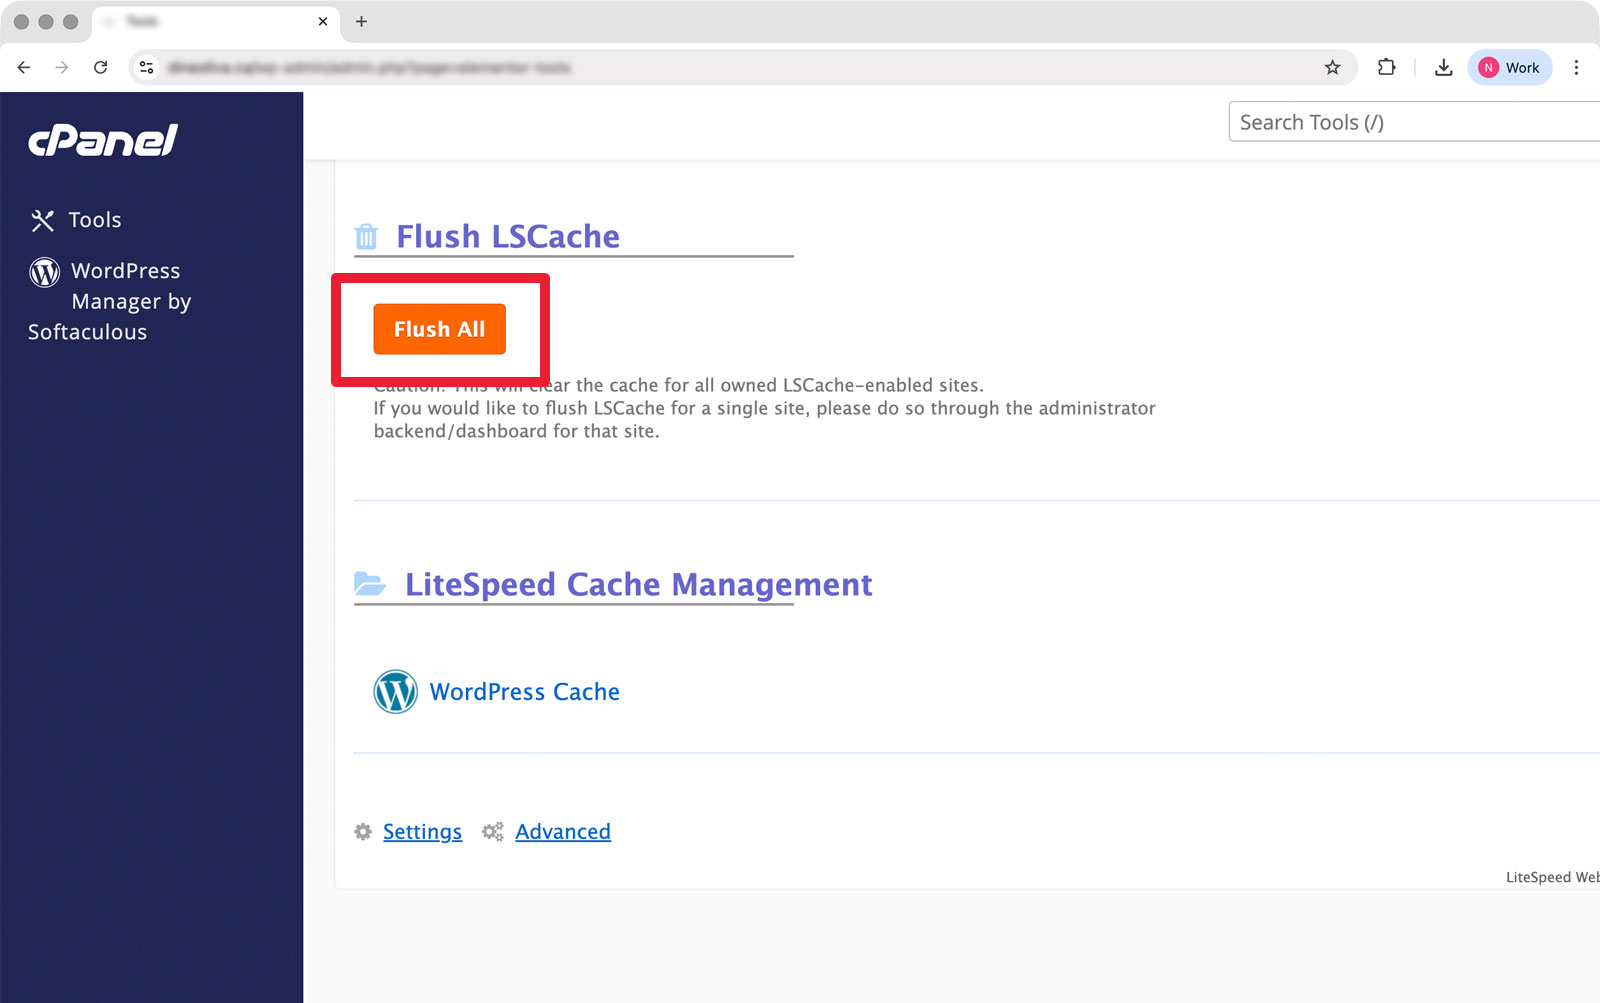
LiteSpeed hosting environments are especially known for this because LiteSpeed servers often integrate tightly with caching systems automatically.
This creates one of the most common beginner frustrations in WordPress: you clear your plugin cache successfully, reload the page, and the old version still appears because the hosting server itself continues serving cached content.
If you’re unsure whether your host uses server-level caching, check their documentation or contact support directly. A lot of managed WordPress hosting providers include caching automatically behind the scenes.
Clearing Cloudflare Cache
Cloudflare is usually where things start getting really confusing for beginners.
Cloudflare acts as both a CDN and security layer, which means it stores copies of your website assets globally to improve performance. That’s excellent for speed, but it also means Cloudflare may continue serving older versions of files after you update your site.
This is especially common after CSS changes, image replacements, homepage redesigns, Elementor edits, or JavaScript updates.
You might clear browser cache, plugin cache, and server cache successfully while Cloudflare continues delivering outdated files globally through its CDN network.
To clear Cloudflare cache:
- Log into Cloudflare
- Select your website
- Open the Caching section
- Click “Configuration”
- Choose “Purge Everything”

This forces Cloudflare to retrieve fresh versions of your website files from the hosting server.
A lot of people confuse cache issues with DNS propagation problems at this stage, but they’re actually different things entirely.
Caching involves stored website files. DNS propagation involves internet providers updating domain routing information globally after DNS changes are made.
If you recently changed hosting providers, updated nameservers, or modified DNS records, propagation delays may actually be responsible for what you’re seeing instead of cache.
This is why some people may see the updated version of a website immediately while others continue seeing the older version for several hours afterward.
Elementor Cache Problems
Elementor users run into cache-related issues constantly because modern page builders rely heavily on generated CSS and JavaScript assets.
You make changes to a layout, adjust responsive settings, update fonts, or modify spacing, and suddenly the live site still looks old even after refreshing the page repeatedly.
One of the most common Elementor troubleshooting steps is regenerating CSS.
Inside WordPress, go to:
Elementor → Tools → Clear Files & Data
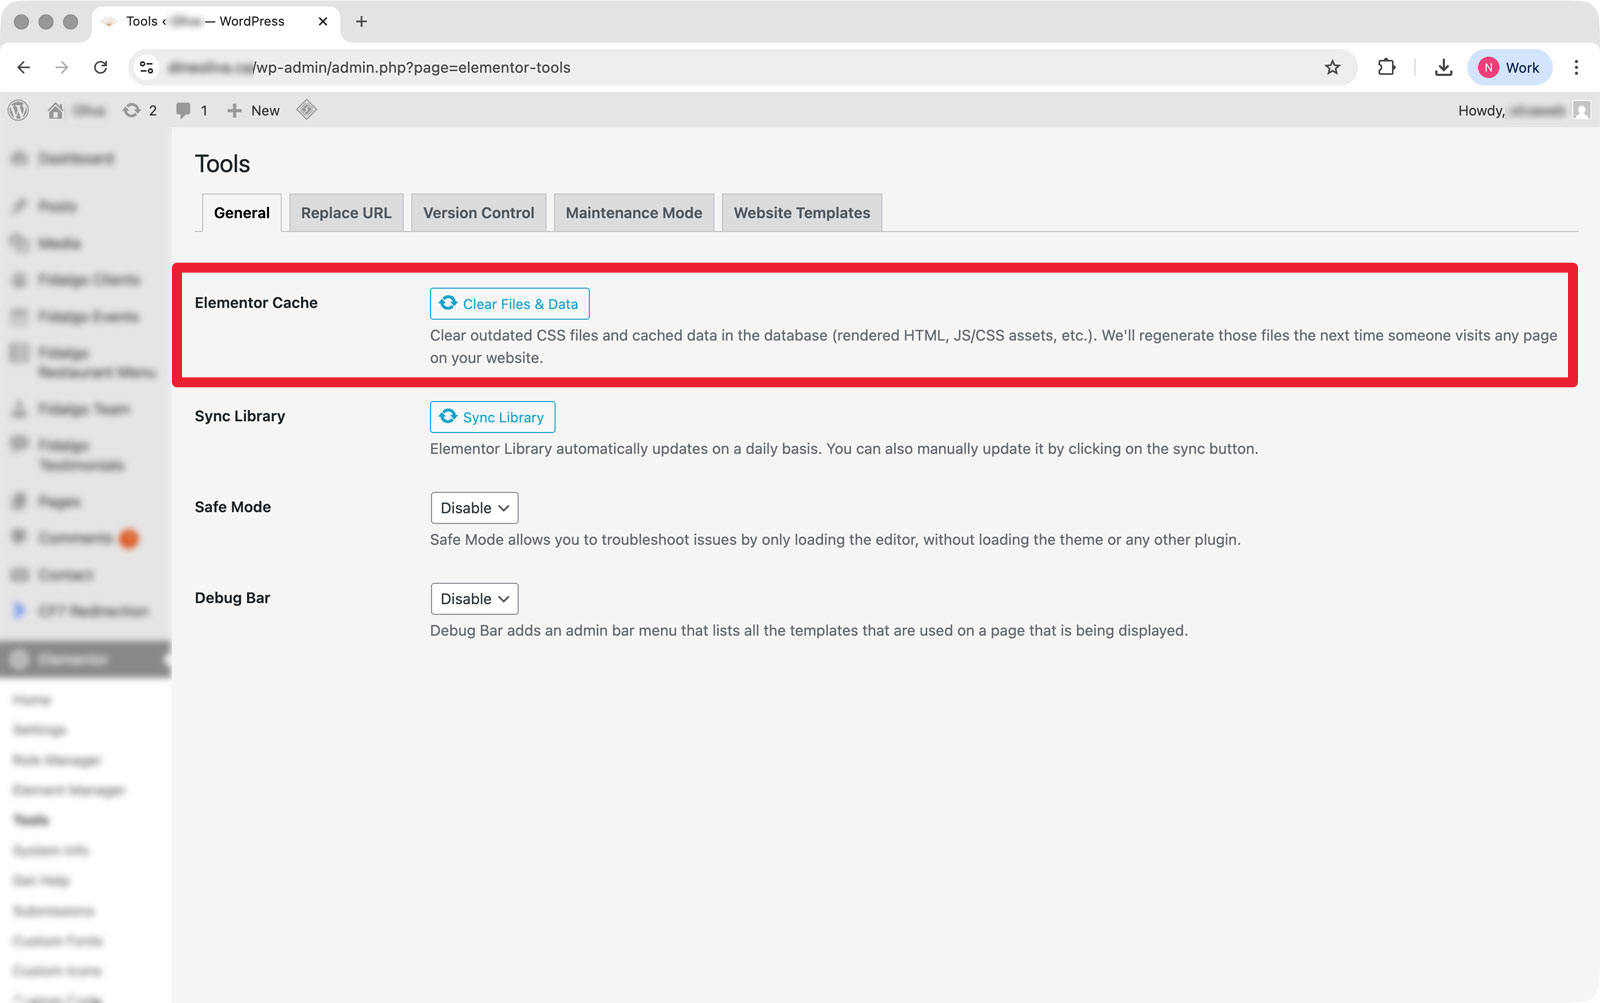
This forces Elementor to rebuild generated assets from scratch.
If you’re also using optimization plugins like LiteSpeed Cache or WP Rocket, it’s usually smart to clear those caches immediately afterward too.
A lot of website owners accidentally make troubleshooting harder here by changing too many things simultaneously. They start disabling random optimization settings, purging cache repeatedly, enabling experimental features, and generally throwing every possible fix at the problem at once.
That usually creates even more confusion.
The better approach is slowing down and isolating variables methodically.
What to Do If Clearing Cache Still Doesn’t Work
Sometimes cache genuinely isn’t the issue.
This is where people usually start getting frustrated because they’ve already cleared browser cache, plugin cache, server cache, and Cloudflare cache, yet something still looks wrong.
At that point, there are a few other common possibilities worth considering.
CSS optimization conflicts are one of the biggest ones. Some performance plugins aggressively combine or minify CSS files, which can occasionally break layouts after updates.
JavaScript optimization can also create issues with menus, sliders, forms, animations, and page builders.
Hosting-related problems can play a role too. Outdated PHP versions, overloaded servers, or improperly configured optimization systems sometimes create symptoms that look like cache problems even when they technically aren’t.
There’s also the possibility that you’re dealing with DNS propagation instead of cache, particularly if you recently migrated hosting providers or changed DNS settings.
The important thing is staying methodical instead of panicking and changing random settings blindly. Most WordPress issues are fixable. The goal is narrowing the problem down logically instead of creating three new problems while trying to solve the original one.
When It Makes Sense to Get Professional Help
A lot of business owners start managing their WordPress websites themselves because WordPress makes website management feel approachable initially.
And for basic updates, it usually is.
The challenge is that modern WordPress sites eventually become layered with caching systems, optimization plugins, CDN configuration, DNS management, SSL certificates, performance tuning, and server-level settings.
At a certain point, troubleshooting starts drifting away from “website editing” and closer toward actual infrastructure management.
That doesn’t mean you failed or “aren’t technical enough.” Modern websites are simply more complicated under the hood than most people realize when they first start using WordPress.
If your website generates leads, bookings, or sales for your business, downtime and broken functionality can become expensive quickly. There’s nothing wrong with deciding you’d rather have somebody experienced handle the technical side properly so you can focus on running the business itself.
Punch Digital provides WordPress troubleshooting, maintenance, optimization, and support services for businesses across Langley and the Fraser Valley.
Need a Hand With Your WordPress Website?
WordPress has become incredibly accessible over the years, but modern websites are still made up of a lot of moving parts behind the scenes. Caching systems, performance plugins, DNS configuration, hosting environments, SSL, page builders, and third-party integrations can all interact in ways that make troubleshooting difficult — especially when your website matters to your business.
If your site is still acting up, you’re running into issues you can’t confidently resolve, or you’d simply rather have somebody experienced handle the technical side properly, we’re here to help. Tell us what’s going on below, and we’ll point you in the right direction.
Final Thoughts
Caching is one of the most important parts of modern website performance, but it’s also one of the most misunderstood parts of WordPress.
Most of the time, when your website changes don’t appear properly, the site itself isn’t broken at all. Somewhere along the chain, an older cached version of the page is still being served instead of the updated one.
The trick is understanding where those cache layers exist: browser cache, plugin cache, server cache, and CDN cache.
Once you understand how those systems work together, troubleshooting becomes much less frustrating.
And if clearing cache still doesn’t solve the issue, don’t panic. Problems involving generated CSS, optimization conflicts, DNS propagation, or hosting environments are extremely common too. The important thing is approaching troubleshooting calmly and systematically instead of randomly changing settings and hoping something works.